CLICK HERE FOR FREE BLOG LAYOUTS, LINK BUTTONS AND MORE! »

Thursday, March 31, 2011

VERSATILE AWARD


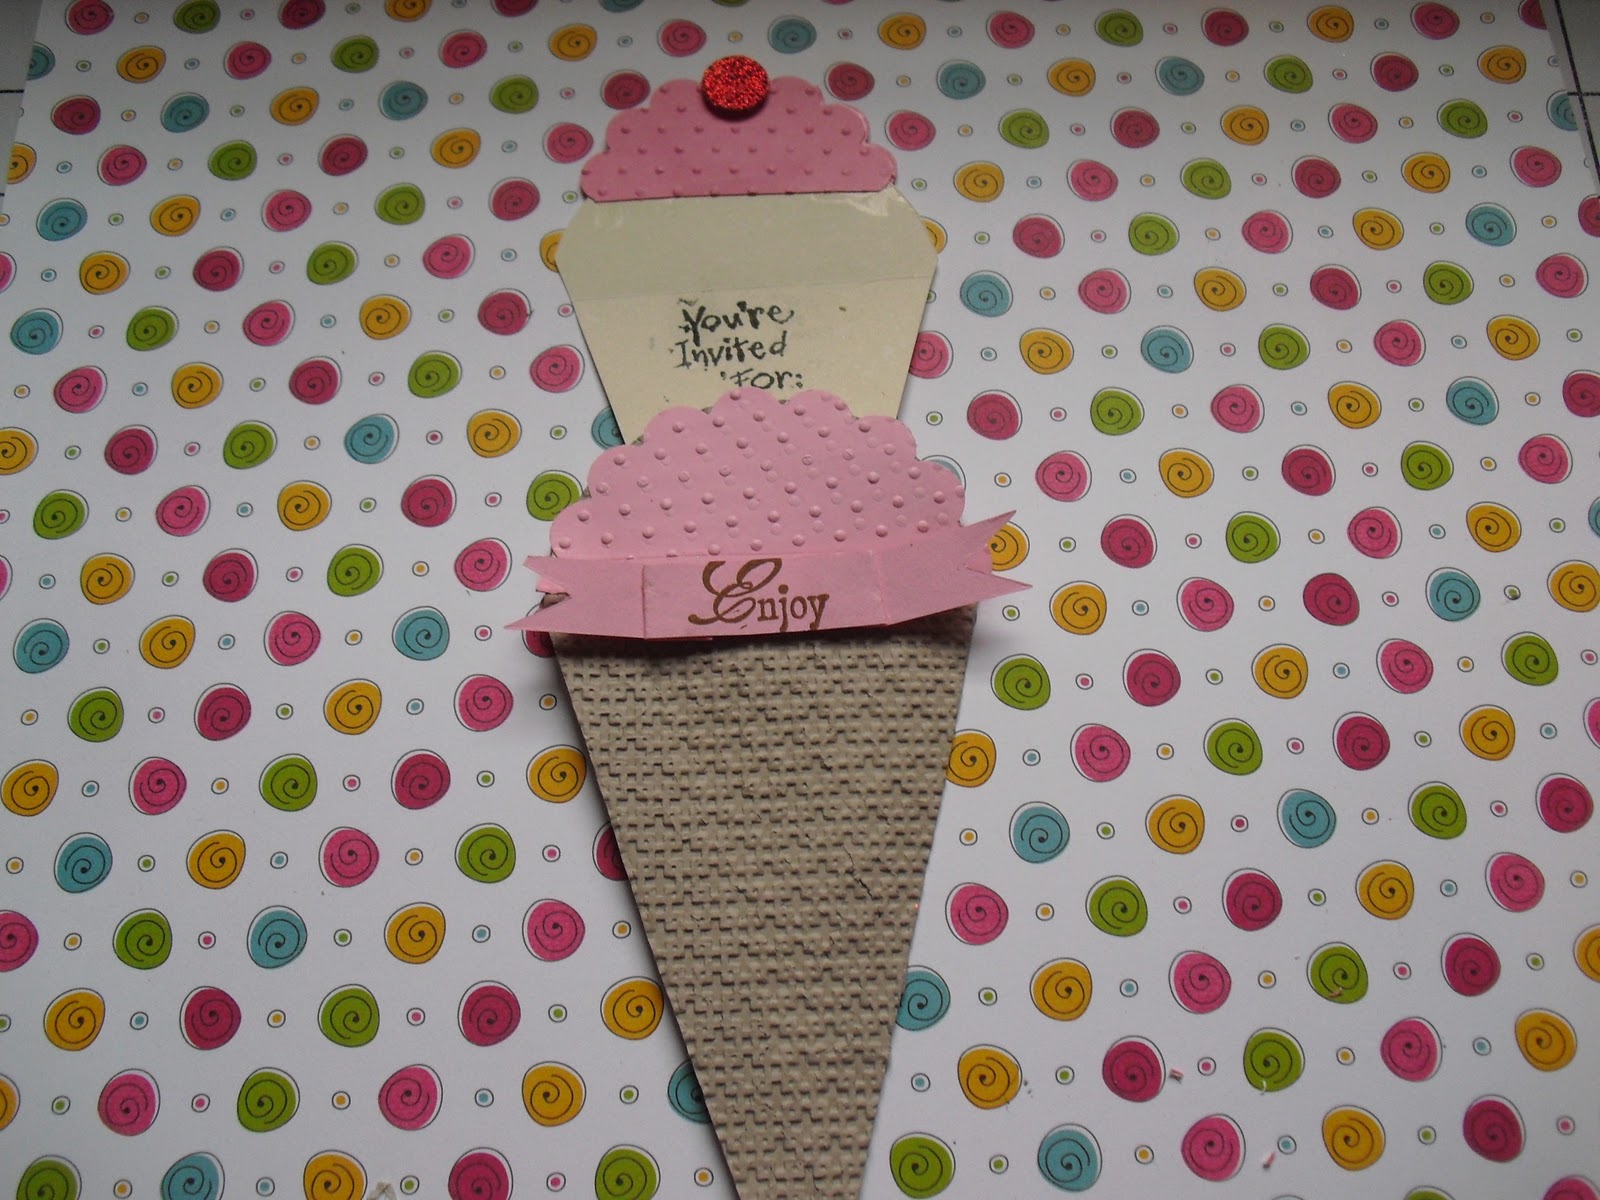
Forever Young cartridge, Page 72, cut @ 8 1/4"
While blog hopping yesterday I saw so many wonderful ideas.  This cute little purse caught my attention and I decided to case it.  It was posted on Kelly's Memory Craft blog (#5 on my list).  Check her blog for this adorable little purse.   

THANK YOU SO MUCH !!!!!

I received this award from Cecy Garcia and Lisa Monter.  I would like to continue honoring all the talented ladies who share their creative ideas on the web.  It takes time and dedication to maintain a blog and I feel we ALL deserve a standing ovation.
Here are the rules for this award:

1. Thank the person who sent it to you!

2. Tell us 7 things about yourself.
3.  Reward this to 15 bloggers.


The 7 things about me:

1.  I am addicted to stamping and scrapb0oking, but isn't
     everyone!
2.  I am a hoarder of these two crafts!
3.  I have been a Stampin' Up demonstrator for 10 years.
4.  I have been to Italy and it is FANTASTICO!
5.  I have been on two cruises and I'm planning another one.
6.  I worked for LAPD for 38 years and now retired.
7.  I love my family and I'm very proud of my two sons and
     one daughter.

Thoughts of Encouragement

It's amazing O' God, that although You know me better than anyone, You continue to love me, faults and all.  I know I can't earn Your love, Father, so let me learn to enjoy it, to embrace it, and reflect it to others. 

Wednesday, March 30, 2011

HOLE IN ONE!

At our last visit to St. George, Utah, we took my granddaughters to a family fun center to play miniature golf.  They loved it and I had a great time taking pictures. 
Unbelievable, but Angie made a "Hole In One" and she was really excited.  I laughed so much that day it will stay in my memory bank for a long time.  The letters for "Hole In One" were cut from Plantin SchoolBook cartridge.
At Scrappin' Time I was able to use one of their die cuts to cut two black filmstrips to which I added my 2 x 2 pictures.  Love the way this came out.  Now I regret not cutting more of these filmstrips, oh well I'll just have to pay them another visit.  Also used Stampin' Up's photo corners punch to embellish the photos.
I used some of the pictures as pockets to store the rest of my pictures.  I cut the golf ball shapes on the Cricut from the Everyday Paper Dolls cartridge.  Then I glued them to the pictures inside the pocket.  I also used this cartridge to cut the green golf course. 
After playing miniature golf, the girls wanted to run around in the play area where they went wild.  I added ribbons to the letters and sprinkled lots of stars on my 2-page layout.
Again you can see I pulled out the extra pictures from the picture pockets.  The circle golf balls make it easy to pull them out.
I glued two pictures back to back and glued two golf balls together to hold them.  This is one side of the pictures.

And this is the other side of the pictures.  This is a great technique when you have more pictures than you can put on your layout.

I want to thank all of you that have become my new followers and a big "THANK YOU" to MOMO.  I am grateful for this great opportunity that she has created for so many of us.

Well I hope you will let me know what you think of this layout and please come back to visit soon.

Sending you embossed hugs, Erlinda

Thoughts of Encouragement

You may not be perfect--nobody is!  You must have a healthy respect for yourself in spite of your imperfections.

Tuesday, March 29, 2011

Beautiful Botanical Garden

The Bellagio Hotel in Las Vegas puts on a spectacular display every few months and this was the Botanical Garden event that I attended with my granddaughter Angie.  We both loved the beautiful flowers and Japanese figures.

I used the Pagoda cartridge by Provo Craft to cut the lanterns, birds, bridge, and the temple.  There are so many great images on this cartridge, that it was hard to choose which ones to cut.
On the lanterns I added rhinestones and used the same background paper to decorate them.  My friends Isela and Jazmin love to shop at Ross Department Store for their scrapbooking supplies, and so I took their advice.  I found a pack of designer paper by C.R. Gibson called Ruby Lemonade.  It is a pack with 100 sheets of tapestry designs which I loved and all for only $7.  Wow! I'll be shopping more often at Ross.
For the Botanical Garden letters, I used the Cursive 101 cartridge which I had not used before. The letters look like they are welded together.  Will definitely be using this cart more often.
For the black flourish design on the temple I used glitter sticker borders by KI Memories.  Also added a few more rhinestones to the temple.
I think I over did it with the rhinestones on my bridge, but I liked the effect.  I used mounting tape to give all the images a 3-D look.
"Beautiful" was cut from Tinker Bell & Friends cartridge and then embossed with the Finial Press impressions folder by Stampin' Up.  Used black and red cardstock and mounted the black over the red. 

Please let me know if you liked this layout.  Your comments mean alot to me, so please share some TLC. 

Sending you embossed hugs, Erlinda

Thoughts of Encouragement

If you truly want to enjoy your life, you must be at peace with yourself.  The place to start is by being happy with who God made you to be.

Monday, March 28, 2011

Thoughts of Encouragement

"You have not lived today until you have done something for someone who cannot pay you back."   -- John Bunyan

Make a decision today that you will be on the lookout for somebody you can bless.

Sunday, March 27, 2011

CUTE GUMBALL MACHINE


 Good Monday morning everyone.  It's the start of a new week and I'm having the Monday blues.  Why you ask?  Well even if you didn't ask I will tell you.  We're getting down to the wire with Sale-a-bration.  It all comes to an end on Thursday, March 31st ... in just four days.  You still enough time to take advantage of all the free products. With every $50 purchase, you can choose a free product from the Sale-a-bration catalog.

If you've ever thought about being a demonstrator, the starter kits are 15% off until March 31st and by joining you get a $50 Stampin' Up! Bonus Bundle.  In addition, if you host a party, get a free Stampin' Up! product with your $300 workshop.

Do you like the cute gumball machine I made with the Petal Cone die.  There is no end to the projects you can create with this great die.  My upline Sandy Hancock and Chiaki Haverstick are offering a class on the gumball machine and three other different Petal Cone projects.  Check her blog for more details @ http://www.sandystamper.com/.  You can see below how cute her gumball machine came out.

PetalConeBubbleGum
I went to a crop at Scrappin' Time on Saturday and as it turned out the crop was free.  Not only do I love "free" but I love meeting new people.  I met two ladies and we had the entire crop area to ourselves, Wow!  Come back tomorrow and I'll show you what I made at the crop.  Enjoy your day and don't forget to get creative.

Sending you embossed hugs, Erlinda

Friday, March 25, 2011

ICE CREAM CONE OR A CUPCAKE?

Good Friday morning everyone.  I have a few more projects made with the Petal Cone die.  These two ice cream cones look good enough to eat.  Each one is slightly different.  The one on the left side is a two scoop cone.  It is sealed so that the invite inside pops out.  You just have to pull the cherry.  The one on the right is a birthday card that opens on the side to reveal a birthday wish. 
This is the fantastic Petal Cone die (#1218109) that you cut out on the Big Shot machine by Stampin' Up.  I used Early Espresso card stock (CS) to cut the petal cone.
Then I embossed the petal cone with the Square Lattice embossing folder (EF) (#119976) to give it that wafer look.  Added some sticky tape to the left side and closed it. 
I cut another petal cone using Vanilla CS, cut it in half for one triangle and stamped the invite information.  I cut the sides of this piece approximately 1/4" each side, so that it would slide in easily into the embossed cone. 
I used the 3" scallop circle punch to create the ice cream topping for the cone.  Ran it through the Big Shot using the Perfect Polka Dots EF.  Cut it in half and then glued one to the front and one on the back of the petal cone. 
Also punched a scallop circle with the 2-3/8" punch, embossed it, cut it in half and glued it to the vanilla CS using a small tab of CS on both the front and back of this piece.
Cut any excess off the tab, so that it does not show.
Now you're ready to insert the invite into the ice cream cone.
How about a cupcake instead?  Isn't this too cute!  To make the cupcake you basically follow the same instructions as the ice cream cone.  Except for the top of the cupcake I cut a 3- 1/2 inch circle on the Cricut with designer paper.  Fold the circle in half and with the scallop square die run the folded side of the circle through the Big Shot to create the bigger scallops.  You could also use decorative scallop scissors.
Cut approximately 2-1/2 inches off the bottom of the Petal Cone to make it look like a cupcake.  Added a pretty ribbon and a small tag tied with hemp cord.  This one can be used as a birthday card and the inside sentiment also pops out. 

Let me know if you liked all these projects made with the Petal Cone die.  I've enjoyed making them.  As a Stampin' Up demonstrator we are privileged to share ideas with other demonstrators on the Stampin' Connection.  This is where I have seen these great ideas.

Have a blessed weekend and come back on Monday for more fun projects.

Sending you embossed hugs, Erlinda

Thoughts of Encouragement

God will not fill a closed fist with good things.  God is a giver, and you are never more like God than when you give.

Thursday, March 24, 2011

EASTER BANNER

This Easter banner is another project made with the Petal Cone die (#121810) found in the Occasions Mini Catalog which ends April 30, 2011.
I used Chocolate Chip cardstock (CS) to cut three petal cones on the Big Shot.  Depending on how many letters you want your banner to have, you will need to cut one petal to get two triangles for the banner.  

Cut each petal in half and also cut off the folded edge on one side of the petal.  Fold and score the top circular part of the petal.  I also embossed each petal with the Vintage Wallpaper
embossing folder.


With Pretty in Pink CS I cut six scallop tops with the die, one for each triangle.
Punched 6 scallop circles out of the Pretty in Pink CS.  Again, one for each triangle. 
Glue the large half scallop circle underneath the top part of the Petal Cone.  Glue the full scallop circle to the top part.  On White CS punch out six 1-3/8" circles and glue to the pink scallop circles.  I used epoxy stickers to spell out Easter and glued them to each of the white circles.
This is what each of the triangles should look like.  Now you're ready to glue the triangles to a long strip of ribbon.

Lay your ribbon down and start to add your finished triangles.  Place a small strip of red sticky tape to the top inside flap, fold over and press down to hold triangle in place.


Stamped "Happy" on the Pretty in Pink banner and I added Stickles to the scallop circles.  Now I'm ready to hang my banner--as soon as I figure out where I want it.

Banners can be used for all occasions, holidays, birthdays, weddings, congratulations, or to personalize any one's name.  I know I will be using the Petal Cone die on many more projects. 

Have a very blessed day and if you would like for me to show you something in particular, please leave me a comment. 

Sending you embossed hugs, Erlinda

Thoughts of Encouragement

A Lenten Prayer:  In all my daily activities during this time of preparation and longing, help me be open to the graces that You so willingly and abundantly share.  Help me to better understand the depth of the love You offer me and the power of the gift of life You have won for me.  Amen

Wednesday, March 23, 2011

ANOTHER PETAL CONE IDEA

 
Do you know where your Teddy Bear is (lol)? Here's another idea that my upline Sandy Hancock posted recently.  She used the Petal Cone die by Stampin' Up to create a stand for this cute Teddy Bear. 
This is a side view of the Petal Cone.  You cut two out but you only use one full petal and half of another.  Not hard to make.  Imagine you can use any image, it doesn't have to be a teddy bear.  This makes a great little centerpiece for any occasion.


The Teddy Bear is made with different punches.  If you want to duplicate him, here are the measurements:

Bear body - 2" circle
Bear head - 1 3/8" circle punch
Ears, mug, and front paws - 3/4" circle punch
Back paws - 1" circle punch
Hearts for ears & feet - Small heart punch
Nose - 1/4" circle
Eyes - Circles from cupcake punch
Center of eyes - smallest circle of Owl punch

There are dozens of great ideas for this exclusive Stampin' Up die (Petal Cone #121810) which can be found in the Occasions Mini Catalog on page 15.  I will post another one tomorrow which is an Easter banner.  Hope you come back to learn how to make it. 

Embossed Hugs, Erlinda

Thoughts of Encouragement

You may be waiting for God to do something new in your life, but the truth is, God is waiting on you.  There is nothing in your life that you cannot overcome.  You have the power to change.  Strive to be a little more disciplined today than you were yesterday.

Tuesday, March 22, 2011

PAPA & MAMA LAYOUT

When I bought this kit I knew I wanted to dedicate it to my father and mother.  I could not believe the price on this kit which I picked up in the clearance aisle at Michaels--only $2.99.  It is a Recollections "My Ancestry." 
The kit did not come with the bottle caps or the metal keys.  Those I had in my "at home" collection and I thought they went really well with the layout.
I think I've acquired a love for clocks and watches while making this layout.  I love the way they look.  The black lace ribbon was also from my own collection.
The die cuts in this set are great.  The antique look just drew me to buy it.  I added game spinners by Tim Holtz's idea-ology collection to the clock and it gave it that special touch.
The beautiful butterflies were another reason this designer paper caught my attention since butterflies are my favorite.
I added this beautiful black satin pleated ribbon, that I forgot where I bought, but it went really well with this layout.  I was glad I was finally able to use it. 
Now I just have to find pictures of my parents to place on this adorable layout.  I may have to twist my sister's arm to get her to send me some pictures since she has most of my parent's albums.  

Well that's my project for the day.  I hope you liked it and are motivated to create something yourself.  Thanks for visiting and come back soon.

  Sending you embossed hugs, Erlinda

Thoughts of Encouragement

You cannot hang out with negative people and expect to live a positive life.

Monday, March 21, 2011

PETAL CONE DIE

Although the weather was not the greatest here in Vegas, my weekend was wonderful.  My daughter had a Tupperware party Friday night and my son Eddie was serving up the margaritas.  Everyone had fun.  Then on Saturday morning, I attended a Women's Retreat that helped me reflect on myself.  Later that day the house was filled with friends who came to make Easter cards.  I enjoyed their company and it looked like everyone enjoyed making the cards.  Sunday started out with attending church and listening to an inspiring sermon.  Later, I attended a free Crop (I love Free) so my entire weekend was filled with special moments and for this I am grateful.
Petal Cone BigZ die (#121810)
One of my newest toys is the Petal Cone die by Stampin' Up.  I am amazed at how many things you can make with this great die.  I tried my hand at making three projects for you to view.  I was inspired by my upline Sandy Hancock and all the great projects she posts. 
I made two carrots with the die. The first one had the cute bunny on it.  The bunny was created with different Stampin' Up punches and it was easy to make.  The second carrot is made with two Petal Cones glued together to form a box. 
This is a side view of the carrot box which can be filled with lots of Easter candy.  I embossed the box with the Swiss Dots embossing folder, but you can't see it very well in this picture.
The last project is actually my favorite.  Yes this corset was also made with the Petal Cone die.  In addition to the Petal Cone die I used the Fancy Box die to cut a box and then glued the Petal Cone cutout to it.  This project would be ideal as a party favor.

Hope you like the ideas and I will definitely be posting more projects made with this fantastic die.  Enjoy your day and please come back again.

Sending you Embossed Hugs, Erlinda
Related Posts Plugin for WordPress, Blogger...