CLICK HERE FOR FREE BLOG LAYOUTS, LINK BUTTONS AND MORE! »

Friday, July 29, 2011

PETAL CONE ALBUM


WOW, we made it to Friday!!

For this mini album I used the Petal Cone die by Stampin' Up.  It was fast and easy to assemble since I already had the flower made from the Fancy Flower punch.

 
Sorry for the dark pictures.  You need to cut 4 petal cones.  If you own the crease pad it is best to use it so the crease lines don't tear.  On only one of the cut outs remove the left side crease, leaving the shape of a heart.


I embossed the heart shape with the Swiss Dots embossing folder and added a piece of decorative paper. Take one of the other petal cones, crease the side forward and add sticky tape as shown.  Remove sticky tape and mount the heart shape to form the album.

Continue to add sticky tape to the other two pieces and mount each one behind the first piece to complete the album.

This is how the album should start to look. You can then add pictures and embellishments to the inside pages. 

And now it's time to embellish the front.  My favorite part of this project.  I used the You're a Gem stamp set, Little Leaves sizzlet die, Fancy Flower punch, Scallop Trim border punch, and designer paper all by Stampin' Up, Martha Stewart Monarch Butterfly punch, and Tim Holtz's Hardware Findings die.

Have a great weekend.  Stay safe and come back and visit again.

Erlinda


Thoughts of Encouragement

Open your heart by faith and receive whatever you need today.  Step out in boldness and strength and move forward because the Lord is with you.

Thursday, July 28, 2011

SEW SWEET II

Hi everyone!

As you can see, I am hooked on the Sewing Room die by Tim Holtz. 
This the third layout in which I have used it. 
Let me share with you how I made this layout 


I used a sheet of  "Lovely" shabby chic designer paper by My Minds Eye.  Then added a bottom border of pink card stock using the Martha Stewart punch, 12 inches of measuring tape ribbon and a strip of pretty rose lace ribbon.  Also, tied the same ribbon at the top right corner.

The letters for "SEW" were cut from the Storybook cartridge and the word "Sweet" is a Sizzix die. 

I cut a 4" x 6" black cardstock photo mat and used the buttons from the Sewing Room die for the corners.


The fun part of scrapbooking is adding all the embellishments.  This is what I used:

Dress form - Sewing Room die 
Sewing Machine - Heritage cartridge
Spool and thread (at top) - Happily Ever After cartridge
Black button and spool (at bottom) Sewing Room die
Scissors - Wall Decor and More cartridge
Black crochet flowers
Decorative button

The finished layout is the one at the beginning of this post.  Hope you enjoyed.

Take time to C.R.E.A.T.E. and come back soon.

Erlinda 

Thoughts of Encouragement

Start everyday by acknowledging that God is your strength.

Wednesday, July 27, 2011

More of Gloria's Pages


I am amazed at how my friend Gloria has taken a liking to scrapbooking.  She admits that for a whole week she has been acting like a little kid with a new toy.  It's endearing seeing the excitement on her face.  I love all her ideas and so I wanted to share more of her pages.  


She made the floral arrangement to place on the cover of her album.  She did a fantastic job and finished just in time for her son's wedding this weekend. 

Great job Gloria!

Thank you for visiting my blog.

Erlinda 

Thoughts of Encouragement

Worship beats worry every time.  When you learn to be a worshipper and not a worrier you'll begin to experience the abundant life that Jesus came to give us.

Tuesday, July 26, 2011

L-O-V-E


Good Tuesday morning everyone!

On Mondays I usually meet with a group of very creative friends. We enjoy getting together to work on different projects and exchange ideas.  Monday is one of my favorite days of the week.  Yesterday I worked on this layout of my beautiful daughter.

I used the Tim Holtz Sewing Room die to create these dress forms.  I love the way they came out.  I used pearls, lace ribbon, designer paper and impression folder to decorate them.

The designer paper is Lost and Found "Home Sweet Home" by My Mind's Eye.  It's a specialty paper with glitter accents that I love.  The large flowers were made with Stampin' Up punches and the small flowers are by Recollections.

Added the spool with thread which is also part of the Sewing Room die.  A few pretty buttons and my layout is complete.


I just had to frame this layout which I plan to give to my daughter as a reminder of how much I L-O-V-E her!

Thanks for dropping by to visit my blog.

Erlinda 

Thoughts f Encouragement

Unless we humble ourselves and let go of our stubborn self-will, we will not see the mighty hand of God at work in our lives.

Monday, July 25, 2011

Travelers Mini Valise Album


Welcome back, hope everyone had a great weekend.

I saw this project on tv's Scrapbook Memories program and decided
 to try making it.
My instructions are slightly different than what you will find online because I didn't have the templates they refer to.  To start, cut two 3" x 5" light brown rectangles.  Cut two 3-1/2" x 5-1/2" dark brown rectangles.  Punch all corners of the dark brown CS with round corner punch and then insert the light tan CS into it. 
Cut a 12" x 5" dark brown rectangle.  Score at 3" and then continue to score at 3/4" intervals until you've scored it 9 times, leaving 3" at the end.  Accordion fold the score lines.  Center and then adhere the front and back covers to each of the 3" ends.  I used sticky tape to ensure a secure hold.

For the handles I used the small and medium oval punches.  I had loaned out my large oval, othewise that's what I would have used instead.  On the Scarpbook Memories tutorial they used a square handle.  You can decide which one you prefer.

For the inside of the album, cut 8 tan 2-1/2" x 3" rectangles.  Align the top edge with the edge of accordion fold, then using sticky tape adhere one page to the left side of each of the four folds at the top.  Adhere the remaining four pages to the right side of each fold aligning the edge at the bottom (opposite direction).


Trim your photos to fit the pages and decorate as desired.

For the front cover I cut "bon voyage" from the Beyond Birthdays cartridge, added Stickles and a metal tag.  Also used bronze brads and brown scallop ribbon.  To the inside of the album I used Panorama designer paper by Making Memories and K Company Tag Pad.

To get better step by step instructions go to:

Glad you joined me today, hope you come back soon.

Erlinda

Thoughts of Encouragement

We've got to be willing to say, "God, I can't do this myself; I need your help."

Friday, July 22, 2011

SEW SWEET

Happy Friday friends!

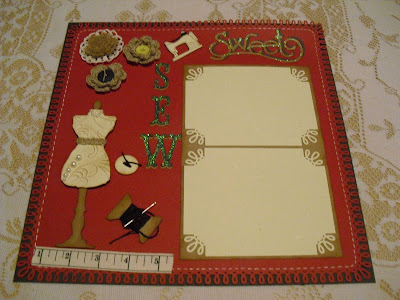
A few days ago I went on-line to purchase the Sewing Room die and couldn't wait to use it.  I invited my friend Chiquis to come over and play and look what we made.  Isn't it super cute!  


This was a joint effort and both Chiquis and I added our own individual touch.  She crochet the doily flowers and the belt on the dress.  We embossed the dress with the Elegant Lines impressions folder and added white pearls.

The border on the red cardstock was made with the Martha Stewart corner and edger punches.  With a white gel pen the stitching around the red mat was created. We added brown thread and a real needle to the spool.  Used ribbon with the measuring tape image.

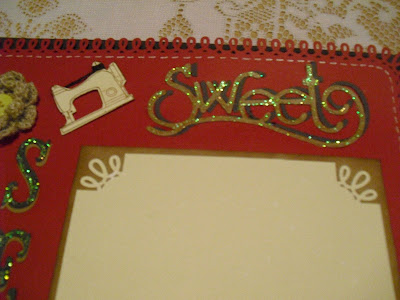
I used the Storybook cartridge to cut the letters for SEW and a Sizzix die for the word SWEET and then we added Stickles.  The sewing machine was stamped with Stampin' Up's Sew Suite set to which Chiquis added some thread also.  Finally we mounted our completed creation onto brown cardstock.


This is the Tim Holtz alterations Sewing Room die which I bought from http://www.timholtz.com/.  You can use the coupon code SSUPERQ3 for 20% off your total order. 

I want to thank Chiquis for joining me in some scrapbooking FUN.  I think this was a "it takes two to tango" effort.  Hope we can do this again.

Thanks again for stopping by.  Have a blessed weekend
and come back and visit soon.

Erlinda

Thoughts of Encouragement

Thank You, Father, that even in the uncomfortable spots in life, I can have confidence that You are aware of me, that You care about what is happening to me, and that You have a plan to bring good into my life and through my life as a result.

Wednesday, July 20, 2011

A NEW BEGINNING!


You know that rare moment when you give a helping hand or when someone offers you a helping hand the feeling that you feel is amazing.  It's hard to describe, but it leaves you with a grateful heart.  This past week I've felt two such blessings. 

First, my friend Cecy and her family unselfishly came to my rescue by cutting my front yard bushes and removing weeds without my knowledge. It was a surprise that brought tears to my eyes.  On my own and aging overcoming me, I am unable to do this myself, so Cecy, her husband Hugo and her family were kind enough to help an old woman.

My second blessing has to do with the above page layout that my friend Gloria made for her son's upcoming wedding.  She took a wedding sticker and placed the wedding couple's faces to the stickers.  It looks fantastic.


Gloria has never done any scrapbooking in her life.  I had shown her my pages and invited her to join me to do some cropping, but she would say she didn't know and would not try it. I finally stopped pressuring her.  Recently, she asked me if I could help her make a wedding album for her son.  I said NO! she would have to make it herself (lol), but I would guide her.  She had no supplies to start with, so I gave her a 12x12 black album and she chose designer paper from my stash and showed her how to cut some embellishments.  


Well within a few hours I was amazed at her creativity.  I gave her the supplies and offered a few tips, but she did the rest herself.


She went home excited, motivated, and ecstatic about what she had created.  I was also sharing in her excitement and in awe of how fast she had caught the scrapbooking bug. 
She is an excellent seamstress, she crochets and embroiders.  She used these talents to make the flowers and design on this border.  Now all she needs is to make the mats for the wedding pictures.  Helping her find her inner creative  soul makes me happy.

I have a grateful heart knowing that God surrounds me with good friends.

Thank you for stopping by,

Erlinda

Thoughts of Encouragement

Negative people aren't negative because of their outside circumstances.  They're negative because of what's inside their hearts.  Positive people aren't people who never have tough times--they're people whose hearts are tuned toward God and toward good.

Tuesday, July 19, 2011

GIRL SCOUTS @ CPK

Good Morning everyone!

Last week my daughter Terry, who is a new troop leader for Girl Scouts organized their first outing to the Californa Pizza Kitchen (CPK).  There at CPK each of the nine girls in the troop were treated to making their own pizzas.  They were also allowed to tour the kitchen which was very interesting. 

I cut the letters for Girl Scouts from the Plantin Schoolbook cartridge. 
I used the take-out menu, doggy bag and location guide as embellishments for this layout.

The location guide was ideal as an accordion mini where more photos can be placed.

My friend Cecy gave me the yellow doily which she bought at the Dollar Store.  I liked it and decided to use it here. Then I mounted a voided gift card and underneath that I cut out the troop number.

It was a great experience that we captured on film.  I just haven't developed the pictures, but I have the layout ready!

Have a great day and please come back again.

Erlinda


Thoughts of Encouragement

The fruit of God's spirit is love, joy, peace, patience, kindness, goodness, faithfulness, gentleness, and self-control.  These character traits are proof that God is at work in our lives.

Monday, July 18, 2011

San Diego Mini Accordion Album

Hi everyone, hope you had great weekend.

I found the directions for this accordion album @ http://www.scrapyardchicks.com/ on You Tube.

I made this album for a special friend who recently went to the San Diego Zoo.  The designer paper is from the Safari Kids stack by DCWV.  The letters were cut from Provo Craft's Plantin Schoolbook cartridge.


The zoo gate was cut with the Paper Dolls for Everyday cartridge and rhinestones were added to it.  To the tie pages down I used brown satin ribbon.

I added tags to several of the pages.  The images on this DSP are really cute.

There is room to put eight photos on either side of the album for a total of over 16 photos because the tags can also be used for photos or journaling.


When both sides of the accordion album open up, you can see how much space is available for pictures.  I enjoyed making this album, and I hope my friend likes it too.

Thanks for stopping by.  Enjoy the start of a new week.

Erlinda
Related Posts Plugin for WordPress, Blogger...