CLICK HERE FOR FREE BLOG LAYOUTS, LINK BUTTONS AND MORE! »

Friday, April 29, 2011

PERSONAL JOURNAL

Last month I attended a crop at Scrappin' Time and I met a very nice lady that I am embarrassed to admit I forgot her name.  She showed me how to make these nice journals which make great gifts.
So I can't remember her name, but I'm hoping I remember how to make the journals.  You'll need a 12 x 12 piece of color card stock (CS).  Score it at 2-3/4", 7-1/4" and 7-1/2".  Make sure to crease the score lines well.
You will need to purchase a legal-size ruled pad cut in half.  Office Depot will cut them for a very small fee.  Place sticky tape to the top, bottom and sides on the back of the pad.  Remove the sticky tape and adhere it to the right side of the scored CS.  The finished journal measures 4-1/2" x 12".
Fold over the left side that measures 2-3/4" and place sticky tape to the top and bottom edges only, leaving a pocket to place miscellaneous items inside. 

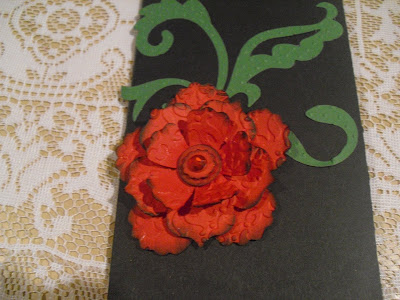
Now you're ready to decorate the front of the journal.  I used the Fun Flower die by Stampin' Up and the Flourish #2 by Sizzix which are embossed with the Vintage Wallpaper and Swiss Dots impression folders.  Also added some pretty photo corners and red rhinestones.  This came out better than I expected and I will definitely be making a few more.

I want to wish everyone a great weekend and invite you to come back Monday for more creative ideas.

Sending you embossed hugs, Erlinda

Thoughts of Encouragement

Don't let the regrets of yesterday destroy the hopes of tomorrow.  No matter what has happened in the past God is a God of restoration and He will restore what the enemy has stolen from you.

Thursday, April 28, 2011

BACK TO SCHOOL


The last time I went to St. George, Utah, I visited one of my favorite scrapbooking store and found out it was closing its doors.  Pebbles in my Pocket was having a close-out sale and this Back to School kit was one of my purchases. 

The kit was fairly easy to put together, but as always I changed it up a bit.  The kit contained American Crafts supplies.  I added some extra embellishments like the scissors, pencils and stars by Reminisce die cut stickers. 

On this page the "Elementary School" sticker was extra.  The alphabet folder opens at the top to form a pocket where you can add memorabilia.

The yellow card stock on this page also opens at the top so I can store extra pictures. 

Well it was fun making this layout and I like how it came out.  Hope you're inspired to get creative.  Thanks for visiting and I invite you to come back soon.

 Sending you embossed hugs, Erlinda

Thoughts of Encouragement

Precious Father, thank you for speaking blessings over my life in Your Word.  Thank you for equipping me with everything that I need to be successful.  Teach me to consistently believe in and declare Your blessings over my life and the lives of those around me.

Wednesday, April 27, 2011

3-TIER BIRTHDAY CARD

This card uses the double-slider construction technique.  For my 3-tier birthday card I used mostly Stampin' Up supplies which include:

Four Frames stamp set (#123440)
Party this Way stamp set (#120609)
Decorative Label punch
Real Red card stock
White card stock
Springtime Vintage designer paper
Scallop Circle punch
1-1/4" Circle punch
Scallop Edge Border punch

This is the closed view of the card.  The two top tiers slide down into the bottom tier of the card.  I think this is a cool technique. 

The instructions for this technique are too lengthy to post.  If you would like a copy, please send me your address and I can forward you the instructions by mail.

Hope you enjoyed this technique and give it a try.  Again thank you for visiting my blog.

Sending you embossed hugs, Erlinda

Thoughts of Encouragement

O taste and see that the Lord is good; how blessed is the man who takes refuge in Him!   Psalm 34:8

Tuesday, April 26, 2011

STAMPIN' UP SUMMER MINI CATALOG

http://204.228.150.61/catalogs/flash/en-US/20110314_kk34dsh_SummerMini/index.html

Exciting news!  The Summer Mini Catalog is packed with so many summer choices.  From stamp sets and wheels the new products are fresh, fun and the project ideas are bright and happy as well!  You can purchase from this catalog starting this Sunday, May 1 and it runs through August 31, 2011.

I made three cards with the new embossing folder (EF) "Flower Garden" (#123113) which you can see on page 24 of the mini.  Unfortunately you can't see the embossed image very well, but believe me it is very stunning.


On this card you can see the embossing better.  For this card I also used the butterfly punch.  Embossed the butterflies with the Swiss Dot EF and added tiny pearls.


Also used the Decorative Label punch and Four Frames (#123446) stamp set.  The designer paper is Springtime Vintage (#121782) from the Occasions Mini Catalog which ends on April 30th. 

To view the Summer Mini Catalog online, just click on the link below the catalog.  If you would like to place an order, please email me directly.

Enjoy your day and please come back and visit again.

Thoughts of Encouragement

God went to great lengths to make sure that each of us is an original.  Live this day with the attitude, I am enjoying the person God made me to be.

Monday, April 25, 2011

TEACUP CARDS

Good Monday morning everyone.  I hope everyone had a happy and blessed Easter.  Now we're ready to go on to Mother's Day.  I made a few teacup cards out of A Child's Year cartridge by Provo Craft.  They are fairly simple to make and can be decorated not only for Mother's Day but for other special occasions.  The flower was cut with the Fun Flowers die.
On this card I used the new Four Frames stamp set and Well Scripted set which is retired by Stampin Up.  Punched out the verse with the decorative label punch.  Added two silk flowers from the Pretties Set and a pearl.  Tied a pretty brown checkered ribbon to decorate the rim of the teacup and we're done.

This teacup card was used as a Thank You to a special friend.  So as you can see this type of card can be made for all occasions.

Lastly, I wanted to share this family picture we took yesterday.  This Easter was truly a blessing for me to have my entire family together to celebrate my son Miguel's birthday and a family gathering.  Laughter and happiness filled my home and for that I am very grateful to God.

Please be sure to come back tomorrow to share some creativity.

Sending you embossed hugs, Erlinda

Thoughts of Encouragement

Don't compare yourself to other people; learn to be happy with who God made you to be.

Wednesday, April 20, 2011

SPRING GARDEN

Well the middle of the week has arrived and in just a few days we will be celebrating Easter and the Resurrection of our Lord.  I plan to attend our church's three-day Holy Triduum so I will not be posting until after Easter.  I encourage everyone to live the next few days in anticipation of the resurrection of Christ.  
This is the last of the layouts of our visit to the Bellagio Hotel's Spring Garden exhibit.  Still using the designer paper by K and C Company, I added sheer pink butterflies by Crafters Square to this page. 
On this page I added a flower and border trim by Recollections.  The color of the pages is definitely more vibrant in person.  The pictures actually came out a bit drab, but some days the camera works great and like today it won't cooperate. 

Enjoy the rest of your week and I invite you to come back again to share some creativity.

 
H A P P Y   E A S T E R !!!!

Thoughts of Encouragement

The world tells us "you need to see it to believe it.  But God says just the opposite.  Only as you believe it will you ever see it. 

Tuesday, April 19, 2011

SISTERS FOREVER

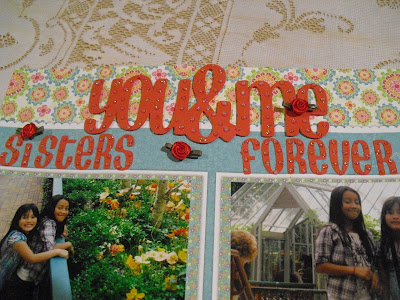
Good Tuesday morning everyone.  You and Me is a layout of Angie and Natie who are typical sisters.  They can be happy one moment and the next they're fighting.  Hopefully, the pages I scrap of them will help them remember the happy moments.

Our trip to the Bellagio Hotel was an exciting and happy experience. The verse and letters for the title of this page were cut from the Don Juan cartridge by Provo Craft and I added lots of Stickles.  The designer paper is by K and C Company.   


I made a pocket out of the larger photo and glued a butterfly to another photo so that it hides inside the pocket.  Also, added flowers by Recollections and a couple branches from the Little Leaves sizzlet die by Stampin' Up.
Here you can see the single photo where I glued one of the butterfies that my granddaughter Natie had made.
I tucked this and several other photos inside the pocket.

These pages are quick and easy to put together and the pretty designs on it make the layouts very colorful.  Hope they inspire you to scrap.

Sending you embossed hugs. Erlinda

Thoughts of Encouragement

What is faith?  It is the confident assurance that what we hope for is going to happen.  It is the evidence of things we cannot yet see.    Hebrews 11:1

Monday, April 18, 2011

Butterflies Everywhere!

My 6-year old granddaughter asked me to show her how to make these butterflies a few weeks ago.  She got so good at making them, there was no stopping her.  She even embossed them and combined the different colors all by herself.  I was totally impressed because she only used scraps.  Yesterday, she handed me all the butterflies she had made and sadly told me she was giving them to me because her mommy was going to throw them out.  I could not bring myself to get rid of them, so here's what I did with her butterflies.
Natie's butterflies were perfect for this layout.  Each butterfly lifts so I can add some journaling.  The pictures were taken at the Bellagio's Spring Floral exhibit.  At the exhibit there is a butterfly sanctuary where we saw some beautiful butterflies.  Natie's butterflies are just as beautiful.
Added floral embellishments by Recollections to both pages.  Lace embellishments "boutique fleur" by Recollections were also used underneath the pictures of this layout.  Oh, I forgot to mention the butterflies were made on the Big Shot with the Beautiful Butterflies bigz die by Stampin' Up.
The designer paper (DSP) is from K and C Company which I found in the clearance section of Michael's.  Being the bargain shopper that I am, I could not leave it behind.  What I love about this colorful stack is that it has 60 instant pages.  You just have to add your pictures and a few embellishments.  In the next few days, I will be posting more layouts with this DSP.

Enjoy your week of Spring break and come back and visit again.

Sending you embossed hugs, Erlinda

Thoughts of Encouragement

Your faith will help you overcome obstacles and allow you to reach new levels of victory.  It's up to you and it depends on your outlook.  Are you going to focus on your problems, or will you focus on your God?

Friday, April 15, 2011

GIRLS ROCK

The start of the weekend looks great here in Vegas.  Looking forward to some beautiful weather and enjoying the next few days.  My granddaughters love to jump around and play.  I can truly say they "rock". 
I used designer paper from a long forgotten stack called "Flower Shower" by DCWV.  My idea was to make a layout with lots of buttons and this DSP was just the right paper.  Also used Martha Stewart's butterfly punch for the pink strip at the top.  The red/white polka dot ribbon will surprise you.
I punched out nine scalloped circles with Real Red CS which are stacked one on top of the other.  That's why you can't see them quite yet.  But when you flip each one over this is what appears.


The ribbon flower unfolds to reveal eight pictures of my granddaughters. 
For the center of the flower I used a butterfly sticker on top of the last scalloped circle. 
I loved this technique and hope to use it again in another layout.  If you would like the instructions on how to create this fun ribbon flower, please let me know.

I also added Stickles to "Girls Rock" which I cut from the Rock Princess cartridge.  The turquoise circle was cut with Mini Monograms cartridge and then trimmed to fit the edge of the layout.

Hope you enjoyed this layout and please let me know what you think.  Have a very blessed weekend.  I'll see you next week, if you come back and visit.

Sending you embossed hugs, Erlinda

Thoughts of Encouragement

Today is your day of victory.  As you spend time in God's Word, you will begin to experience a life of abundance.

Thursday, April 14, 2011

V-LATCH CARD

I was blog hopping yesterday and came across this neat
10-minute video by Dawn Olchefske.  In this video she gives you the instructions for making the V-Latch card.  Check out her blog @ http://www.dostamping.typepad.com/.
Sew Suite stamp set (#122009)
This is the Sew Suite stamp set by Stampin' Up and it can be found in the Occasions Mini catalog, page 33, which ends on April 30th.  It has some really cute images of a sewing machine, ruler, thread spool, pin cushion, etc. 
This is the inside of the card on which I stamped "wonderful Mother" from the Well Scripted stamp set.  This will make a great Mother's Day card for someone who loves to sew.

I hope you can see where the slit for the card is made and where eventually the front and inside of the card close and the V-latch is created.  For the buttons I used the sizzlets die Buttons #5.  I recommend you view Dawn's video and try your hand at creating this card.  I think its super cute!

Enjoy your day and be sure to visit me again.  Leave a comment and make my day!

Sending you embossed hugs, Erlinda

Thoughts of Encouragement

Commit to the Lord whatever you do and your plans will succeed.  --Proverbs 16:3

Wednesday, April 13, 2011

FANCY POCKET CARD

Well hello everyone.  I didn't get much accomplished yesterday because I was feelin' out of sorts, but today is another day!  I wanted to create something pretty and with lots of frills--kind of how I wished I felt today.
Here's a tutorial on how to make this type of pocket card which is not hard at all.  You will need a card size
5-1/2" x 8 1/2" piece of cardstock (CS).  I used Stampin' Up's Perfect Plum CS and two pieces of designer paper (DSP) by K&C.   The DSP is cut at 2-3/4" x 5-1/2" for the front of the card and at 2-3/4" x 5-1/4" for the inside of the card.
Fold the CS in half to measure 4-1/4" by 5-1/2" and then score this piece at 2-3/4" on the front from the bottom edge.
Glue the smaller DSP piece to the inside of the card.  The other larger DSP piece is also glued to the inside upper part of the card.  Leaving a 1 1/2" gap at the top.
Fold the edges of the front of the card up forming a triangle and crease both sides thoroughly.  The DSP will now be showing on the front. 
Punch a hole on both sides of the DSP and thread some satin ribbon, approximately 12" long, and create a bow.  The card is now beginning to look really pretty.
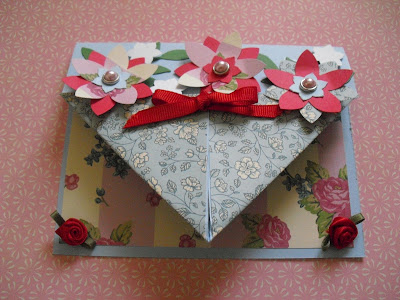
You can now decorate the pocket of your card with all kinds of flowers.  For this card I used white flowers from the Pretties Kit by Stampin' Up and the Little Leaves sizzlits die.  Also added white pearls to all the flowers and bow.
Here's another pocket card I made using the Springtime Vintage DSP #121782 which is still available in the Occasions Mini catalog ending April 30, 2011.

I think it made me feel better creating this pretty card.  Hope you will try this tutorial and let me know what you've created to make your day better.  Let's get together again soon.

Oops, I almost forgot to show you the inside of the card.  I stamped Happy Easter, but you can make this type of card for any occasion.

Sending you embossed hugs, Erlinda
Related Posts Plugin for WordPress, Blogger...