CLICK HERE FOR FREE BLOG LAYOUTS, LINK BUTTONS AND MORE! »

Monday, January 31, 2011

BRIGHT & BEAUTIFUL


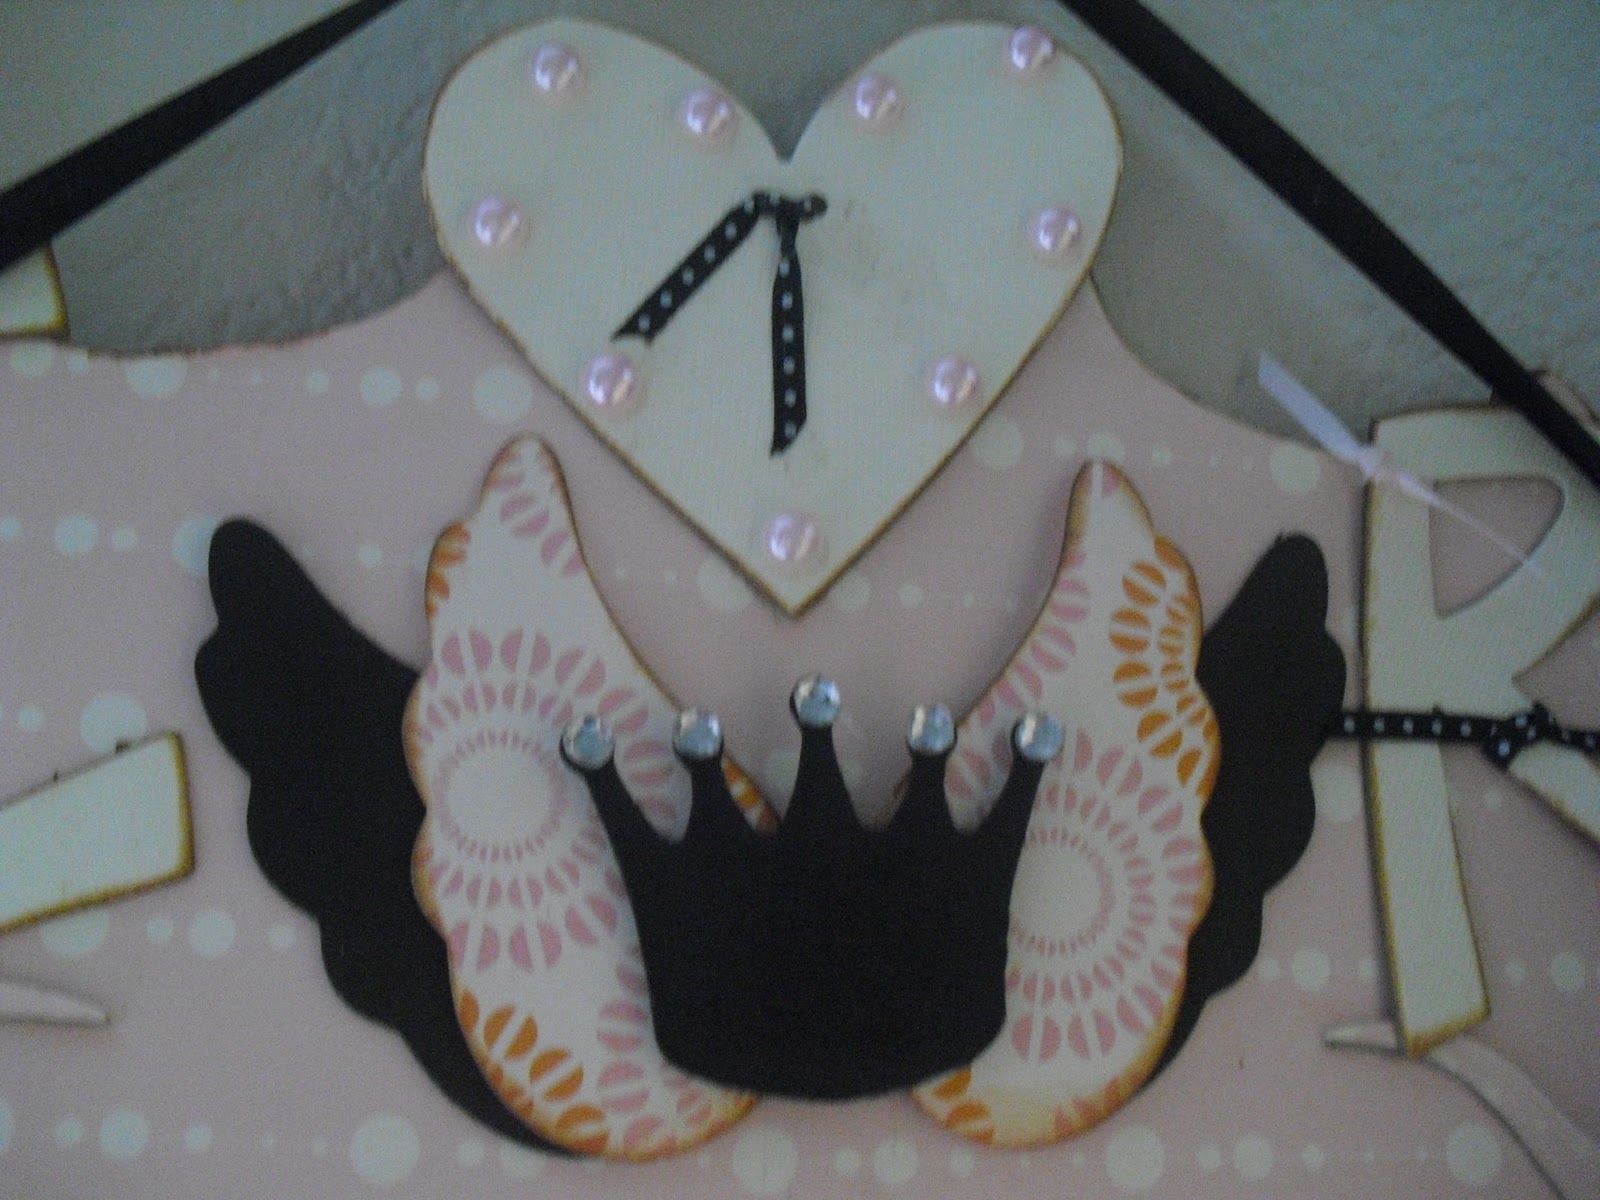
My granddaughter Angie, who is 9 years old, is truly very "Bright and Beautiful."  She is a Girl Scout, in the school choir, is a peer mediator and recently made honor roll.
As I sat in my craft room last night admiring this pretty designer paper from Bo Bunny, I decided to take Angie's picture and surround it with pretty embellishments.  I started by mounting it on a piece of Coredinations card stock.
Next, I cut the title at 3" from the Tinker Bell & Friends cartridge by Cricut.  When I saw the title, I knew it was perfect for my layout.
The Mother's Day Bouquet cartridge is the newest of my acquisitions by Cricut.  It contains some beautiful flower images and I used it to create these flowers.  The leaves are from the Stampin' Up little leaf sizzlet.  I love butterflies and these butterflies are made with a Martha Stewart punch.
I also cut out the swirly butterfly at 2" from the same cartridge and added Stickles to almost everything.  You can't see it very well, but I wrapped ribbon by Martha Stewart all around my layout.
 

Martha Stewart butterfly punch
Stampin Up Little Leaf sizzlet
Bo Bunny designer paper
Martha Stewart apricot 3/16" ribbon
Bo Bunny cutouts
Coredinations card stock
Stampin' Up Bashful Blue and Pretty In Pink card stock
Rhinestone brad
Pink Pearl brads
Stickles

As I was making this layout, Angie saw it and she secretly went to work on her own layout of me.  Of course when she gave it to me, it brought a smile to my face and I cried happy tears.  Below is her own creation.


Hope you enjoyed this layout as much as I enjoyed making it.  Have a very blessed day and bring some "joy" into someone's life.

Thoughts of Encouragement

Happiness is a choice.  Get up today and choose to be happy and enjoy your life.   Make the most of every moment!

Friday, January 28, 2011

You Stole My Heart


My only sister, Maria, has been asking me for her valentine card.  She always appreciates the cards I send her and she saves all of them.  I wanted this one to be special.
I started by cutting out the scalloped heart and angel at 3 1/4" from the Sweethearts cartridge by Cricut with basic black cardstock (CS) by Stampin' Up.

Embossed the white CS with the Swiss Dots embossing folder.  Wrapped pretty pink ribbon around the white CS.  Then I mounted this on Pink Passion CS.
Used puffy stickers to embellish my card.
I'm finally ready to mail my sister her valentine card.  It's in the mail Sis!

Hope you have a great weekend planned.  Stay safe and come back on Monday.

Thoughts of Encouragement

Dear Father, Thank You for the precious opportunity to share Your love and compassion with others today.  I know that as I step out to give of myself, You will use me to be a blessing to others.  Thank You for Your goodness and mercy, which follow me all the days of my life.

Thursday, January 27, 2011

2011 Calendar


I found this cute little calendar on-line.  You can download the template and create it yourself and its free!


Printed it on Pretty in Pink cardstock by Stampin' Up.  When I printed it, I changed the Page Scaling to "shrink to printable area" so that it fit on the page.

After cutting the template and scoring it well, I glued it together with Tombow multi-liquid glue.
I liked the final product.  I know I will get alot of use out my mini calendar.  I plan to keep it by my computer.  If you want to make your own calendar here's the link:


http://www.ii.uib.no/~arntzen/kalender/deskcal-en-2011m.pdf

Hope you liked this project and thanks for stopping by.

Thoughts of Encouragement

Today, take the time to hear someone with your heart, to show that person you are concerned, and that you really care. 

Be sensitive to God's voice speaking within you, directing you on how best to help someone else.

Wednesday, January 26, 2011

FAMILY PICTURE CANVAS

Not the best picture, but it was the best I could get from my camera.  Maybe because its mostly in black and white my Family Picture canvas doesn't show up that great.  Well you'll just have to believe me, it is GORGEOUS in person.
I cased this from one of my favorite stores, Scrappin' Time.  I saw it in the store and instantly knew I had to make it myself.  The beautiful scallop design was made with a Martha Stewart punch.  I just don't know what it's called.  The letters for FAMILY were cut with the Storybook Cricut cartridge and I used my favorite Scallop Trim Corner punch by Stampin' Up for the mounting squares.
I mostly used designer paper (DSP) from The Black Currant Stack by DCWV which is packed with beautiful paper.  My friend Lisa Monter was kind enough to type the poem on vellum for me.  I shaded the vellum with black ink and added designer brads and pearls by Stampin' Up.

Lisa also made this project,  so to see her version of this project go to her blog: http://cricutmomof2.blogspot.com.  
I cut the tags from the Very Merry Tags Cricut cartridge in three different designs on Shimmer paper.  Do you recognize the black flower?  Made it myself with black cardstock and the 2 3/8" extra-large Scallop Circle punch by Stampin' Up.  The gray wired ribbon is from Martha Stewart.

The tags go inside the pocket and eventually I will put pictures of my family on the tags and inside the pocket.  I can also place pictures on either side of the poem.

I really enjoyed making this project and I am going to offer a class on it.  If you're interested in making it, please check the sidebar of my blog for a list of scheduled classes.

Thanks for visiting and please come back again.

Thoughts of Encouragement

When God puts love and compassion in your heart toward someone, He's offering you an opportunity to make a difference in that person's life.  Follow that love, don't ignore it, and act on it.  Somebody needs what you have to give.

Tuesday, January 25, 2011

Stampin' Up! Sale-a-Bration started today-- Jan 25th!

It's finally here!  Stampin' Up!'s annual Sale-a-Bration promotion!  I love this time of year, it's the time of the year that Stampin' Up! gives free stamp sets to customers!  Plus - hostesses get additional benefits too!  Gotta love it!  Here are the details:

THREE EASY WAYS TO EARN FREE PRODUCTS!
  • SPEND! $50 (before shipping/tax) and earn one FREE Sale-A-Bration product of your choice.  Spend $100, receive two SAB products (and so on)!
  • HOST! a workshop of at least $300 (before shipping/tax) and earn one FREE Sale-A-Bration product of your choice.  That's in addition to Stampin' Up!'s already generous hostess benefits!  Schedule your party now!
  • JOIN! Stampin' Up! by becoming a demonstrator during Sale-A-Bration and get your starter kit for 15% off (only $148.75) AND receive a bonus bundle filled with over $50 in FREE products.  See below: 
Bonus-Bundle 
Bonus-Bundle-list 
Here are just a few more reasons to join:
  • Fill your Wish List!  Imagine this!  Save 30% on your first product order of $150 or more (placed within 45 days), plus earn hostess rewards & receive a minimum of three Sale-A-Bration gifts (1 for every $50 in product purchased). Yes, demonstrators get the same perks as our hostesses, plus more!
  • Take a Demo Test Drive!  Enjoy Stampin' Up! Demonstrator discounts and benefits through June 30, 2011 with NO further need to sell or purchase any products beyond the starter kit.  No pressure - just fun!
  • There's no penalty to drop!  If you wish to extend your demonstrator status for the following quarter (July through September), you would be required to have $300 in product sales (including your own orders). 
  • Starter Kit ships FREE!  Yes, that's free shipping!
  • Become a member of my team.
  • Training opportunities! "
How are you going to Sale-a-Brate?
To view the Sale-A-Bration catalog click below:

SAB11_US.pdfSAB11_US.pdf
1184K   View   Download  

    BIRD CAGE LAYOUT

    Monday came and went, and it was the beginning of what I expect to be a wonderful week.  I met with friends, Lisa, Emmy and Cecy to have some fun and we did.  I was surprised that I was able to finish two projects in one day.  I think the creativity was bouncing off of each of us.
    I am in love with this beautiful paper by My Mind's Eye.  This sheet is called "Happily Ever After."  It is very glitz and the images are so subtle and beautiful.  The fabric flowers are by Websters Pages which I bought at Scrappin' Time.  The Eyelet Border punch from Stampin' Up added a very elegant look to my layout.  Did you notice the Scallop Trim corner punch on the edges of the photo mat?  Hmm, my favorite punch.

    I cut the bird cage at 4 inches from the Cricut cartridge called Songbird.  And I added embossed butterfly stickers by Recollections bought at Michaels.  The two-sided DSP with the musical notes is also by My Minds Eye called "Girlfriends" Lovely Paper.
    I cut the banner from the DSP "Girlfriends" sheet and used the rest of the DSP for the picture mats.
    I wish I could take credit for the flowers, but I didn't have time to make my own so I used Prima Flowers "Fleurs de Prisma" which I bought at Scrappy Do.  Each of the mats has an opening and I placed a tag for pictures in each one.  Used Shimmer paper for the tags and Martha Stewart ribbon.

     
    Well I feel I'm on track with my resolution.  For the month of January I've done a page layout each week so far.  For me that is an accomplishment.  

    Come back tomorrow to see my second project which I'm sure you will like.  Have a happy day and may God bless you in all you do today!

    Thoughts of Encouragement

    "If you tell others that you belong to me, I will tell my Father in heaven that you are my followers.  But if you reject me, I will tell my Father in heaven that you don't belong to me."
                                                                           Matthew 10:32-33

    Monday, January 24, 2011

    JEWELRY HANGER

    The start of a new week and I am excited.  I have lots of things planned and with God's blessings I hope to accomplish them.  

    I bought this kit at Julie Jane Paper Company last summer and I finally got to completed it.  So many unfinished projects, so little time. 
    This kit came with all the chipboard, designer paper (DSP), ribbons and wires.  The store personnel cut out my initials and the heart image for me with the purchase of the kit.
    I adhered the DSP to the chipboard,  added rhinestones to the black crown and pink pearls to the heart.  I think I will probably add Stickles to my initials after this.
    Now I can hang my diamond necklaces and bracelets (lol) in an orderly fashion.  Well another abandoned project completed, and so many more to go.  

    If I get motivated, I just might duplicate this project.  It would make a great personalized gift.  There must be a Cricut cartridge that has a similar design.  If you find one, please let me know.

    Enjoy your day and thanks for stopping by. 

    Sunday, January 23, 2011

    Thoughts of Encouragement

    When somebody hurts you, the only way you can overcome it is by showing them mercy, forgiving them, and doing what is right.

    Saturday, January 22, 2011

    BE MY VALENTINE

    Scallop Trim Border Punch (#118402)
    Valentine's Day is fast approaching.  I have seen so many beautiful cards made with this stamp I could not resist buying it.  Last night I finally made my own card. 
    Be My Valentine (#122045)
    This is a new "a la carte" single stamp for only $8.95 from the current Stampin' Up Occasions Mini Catalog.  This catalog is packed with so many new products.  You can view the catalog on line @ http://www.stampinup.com/.
    
    Framed Tulips Embossing Folder (#121809)
    This embossing folder (EF) is so stunning on any color cardstock (CS).  On white CS it looks very elegant.  The EF can also be found in the mini catalog. 
    Don't forget that next week on January 25th, Sale-A-Bration starts.  With every $50 purchase you are eligible for a FREE item from the Sale-A-Bration catalog which can also be viewed on-line.

    Thanks for stopping by today, have a great weekend, and I hope you come back on Monday.

    Thoughts of Encouragement

    Dear God, with Your love in me  I know I can express kindness even to someone who is not kind to me.  Help me to respond lovingly and with compassion to those people who may be having a bad day and are in need of some encouragement.

    Friday, January 21, 2011

    Baby Cupcakes

    
    Build A Cupcake Punch (#121807) and Vintage Wallpaper Embossing Folder (#120175)

    Wednesday was the start of something new.  Emily Morales, Lisa Monter and myself got together to stamp.  We've commited to meeting again next week to share our creativity. 

    This cute baby card was made by Emily.  I think it looks adorable and believe me I am anxious to case it.

    Emily used the new Build A Cupcake Punch from the Occasions Mini Catalog by Stampin' Up.  She embossed the card with the Vintage Wallpaper embossing folder and then distressed it with Chocolate Chip ink.

    She also used the Scallop Circle Punch and the 1 3/8" Circle Punch.  On the frosting of the cupcake she added white glitter puffy paint.  

    Simply adorable!  Great job Emily.

    Thoughts of Encouragement

    Prayer pushes the light and hope into little dark corners of your life.  Pray to God asking Him to reveal to you what you are to learn in your present situation. 

    Thursday, January 20, 2011

    Scalloped Circle Flower Layout - Part II

    This week is going by so quickly, I can't believe today is Thursday already.  Well, I finished my second page layout with the scalloped circle flowers which I made with the Scallop Circle Punch by Stampin' Up. 
    I added these precious butterflies to this page which I bought at the Crafting Place. I love the effect it gives the layout.
    I bought this embellishment by My Minds Eye at Scrappy Do and then added tiny pink pearls from the same package with the butterflies.
    This flower was made with the five petal punch and the leaves are the leaf embosslit, both by Stampin' Up. The large white valentine shape pearls are from Martha Stewart.
    I had a great time creating this layout.  I hope you get motivated to do some scrapbooking yourself.  I'm on my way to accomplishing my goal of a two-page layout each week. 

    Thank you for your kind comments and please come back tomorrow.

    Thoughts of Encouragement

    Dear God, thank you for my friends who stand beside me in all situations.  They are always there when I need them to listen, laugh, and cry.  They are truly so special to my life.  May they realize what their friendship means to me.  Amen.

    Pray for your friends and let them know how much they mean to you.

    Wednesday, January 19, 2011

    Scalloped Circle Flower Layout - Part I

    I just can't stop making these gorgeous flowers.  They are so addicting and beautiful. 

    Just before Christmas last year I emptied out my scrap container.  Well it is overflowing once again.  I decided to start using those scraps again and I punched out scallop circles and five petal flowers. 

    Using different color scraps I was able to make several flowers to place on my scrapbook layout. 
     
    I added rhinestones to the center of some of the flowers.
    I really liked the way the flowers added such an elegant effect on my page layout. 
    This is what I used on my layout:

    Bo-Bunny designer paper (DSP)
    My Mind's Eye for the background DSP 
    Worn Lipstick Stickles
    Gold brads
    Stampin' Up embosslits leaf,
    Bazzill CS strips
    Prima pearls 
    Cricut Tinker Bell & Friends cartridge
    Miscellaneous paper scraps.


    Prima Flowers watch out for the competition.  I will post my second page layout as soon as I finish another batch of flowers.  Let me know if you think I have a future in the flower business. 
    Related Posts Plugin for WordPress, Blogger...